

She bought the greenhouse over ten years ago as a way to
get her family to spend quality time together on a project. Her family
scattered to the four winds over the years, and not having a green thumb she just
‘let it go.’ More recently, she decided to rehabilitate it as a way to grow her
own organic veggies and provide a place for herself and her Buddhist group to
meditate. I constructed a solar greenhouse in the late 1970s that followed the
guidelines of the New Alchemy Institute (now called The Green Center), so now I
get to play in a solar greenhouse again after all these years!
My friend flatly refuses to employ power from the local
utility (Duke), instead relying on three small solar panels that came with the greenhouse:
(1) a 12" x 24" panel powering a ventilation fan, (2) a 12" x
24" panel powering an under-soil heating system, and (3) a 12" x
12" panel powering a (bilge) pump intended to circulate water in the
thermal storage tank. All three solar panels function fine and provide appx 12 vDC
current, which obviously varies according to the amount of solar insolation
available during the diel cycle as modified by weather.
 The ventilation fan also works well; however, I am a bit
confused about its thermostat. Currently, the fan turns on and blows outside
air into the GH when inside air temperature drops to about 65 °F,
and then turns off when greenhouse air rises to 80+ °F. That is obviously backwards
from what it should do, and the manufacturer confirmed to me that the
thermostat was probably wired backwards, but after reversing the thermostat’s
internal wiring based on a diagram he sent me, it still turns on and off
backwards. Maybe I only thought I rewired it correctly but actually didn’t? I’ll
revisit this in the spring, but the fan is now disabled and shuttered for the
winter.
The ventilation fan also works well; however, I am a bit
confused about its thermostat. Currently, the fan turns on and blows outside
air into the GH when inside air temperature drops to about 65 °F,
and then turns off when greenhouse air rises to 80+ °F. That is obviously backwards
from what it should do, and the manufacturer confirmed to me that the
thermostat was probably wired backwards, but after reversing the thermostat’s
internal wiring based on a diagram he sent me, it still turns on and off
backwards. Maybe I only thought I rewired it correctly but actually didn’t? I’ll
revisit this in the spring, but the fan is now disabled and shuttered for the
winter.

There are two four-inch diameter ribbed plastic pipes running the entire length of the perimeter beds at the interface between the native dirt and potting soil. The pipes lead from an air intake box near the center of the GH’s south side (the warmest place in the GH):

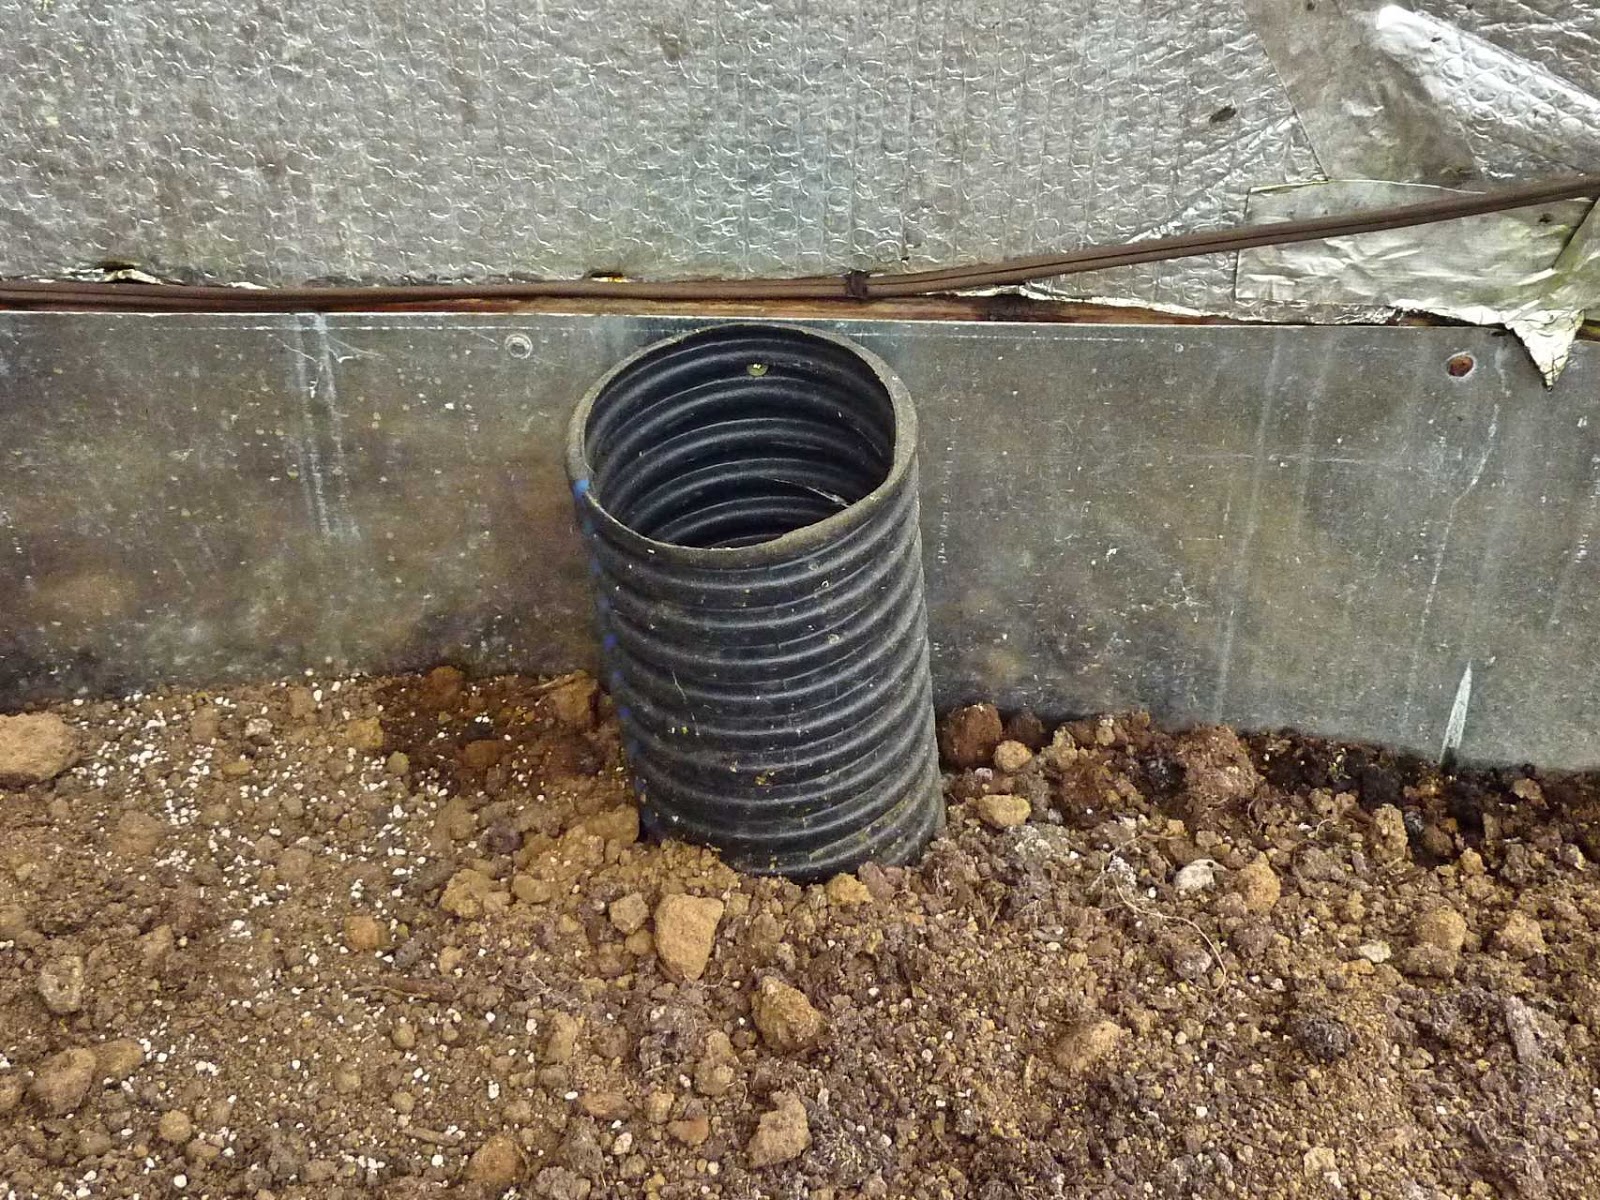
I replaced the seized-up original soil heater fan with a
$10 computer cooling fan and hooked it up to the second 12” x 24” solar panel. When
the sun is shining, the solar panel now powers the new fan, which sucks air into
and pushes it through the two plastic pipes to heat the soils in the raised beds.
Warm roots support veggies better than cold roots! This pic shows the exhaust
end of one of the pipes emerging well above the raised bed to keep potting soil
from falling into the pipe:


 (2) the SW ventilation panel was never completely closed
because the hose was kept there, causing warm greenhouse air to escape to the
outdoor winter environment, and (3) the spigot was destroyed twice in freezing weather
after being left on due to forgetfulness. I convinced her to let me and her
handyman move the spigot to the inside of the greenhouse, which was done in
December 2018, and I then attached a four-way brass water distributor (and a
plastic wye) to it to provide five protected tap water sources inside the
structure.
(2) the SW ventilation panel was never completely closed
because the hose was kept there, causing warm greenhouse air to escape to the
outdoor winter environment, and (3) the spigot was destroyed twice in freezing weather
after being left on due to forgetfulness. I convinced her to let me and her
handyman move the spigot to the inside of the greenhouse, which was done in
December 2018, and I then attached a four-way brass water distributor (and a
plastic wye) to it to provide five protected tap water sources inside the
structure. Next, I connected two soaker hoses to the distributor.
For the short raised bed located along the greenhouse’s west side and beyond
the door, I cut a short section from a garden hose, added male and female
connectors to the severed hose ends, and ran the short hose to the short bed to
connect into a 25 ft long soaker hose. This photo shows the hose running
vertically along both lower sides of the door (the hose is also buried four inches
under the floor sand).
Next, I connected two soaker hoses to the distributor.
For the short raised bed located along the greenhouse’s west side and beyond
the door, I cut a short section from a garden hose, added male and female
connectors to the severed hose ends, and ran the short hose to the short bed to
connect into a 25 ft long soaker hose. This photo shows the hose running
vertically along both lower sides of the door (the hose is also buried four inches
under the floor sand).
The second soaker hose, 50 ft long, was attached to the
water distributor and then run out and looped back to irrigate the long raised
bed. Soaker hoses have small pores that deliberately leak water for irrigation,
but some of the pores are large enough for water to squirt out several feet beyond
the raised beds and be wasted. Therefore, I buried both soaker hoses 2-3 inches
deep in the potting soil to capture all of the irrigation water. These two soakers
irrigate nearly the entirety of the raised beds, excluding only the end of the
long bed which is not yet completely filled with potting soil or contains any plants.
That location will be topped up with potting soil and vegetated in the spring
of 2019, at which time I will add another 25 ft long soaker hose to irrigate it.
The greenhouse has a lot of air leaks, allowing air to
somewhat freely pass in and out of the structure. This undesirably cools the
interior in winter, although probably also helps to beneficially reduce
overheating in summer. Leaks are caused in several ways, and I have plugged
some of them, but much more repair will be needed next year. As mentioned
above, one leak was stopped by moving the water spigot inside the greenhouse,
thus eliminating the need to run the irrigation hose through an always-open
vent panel. A second leak was closed by replacing a rotted structural 2x4 that a
vent panel was attached to. A third leak was fixed by reseating weather-stripping
that had become loose and sagged away from a vent panel over time. A fourth
leak was mostly closed by replacing two rotted structural 2x4 boards that were
fitted horizontally to the outside Hardy-board wall. Finally, several vent
panels did not close completely because the aluminum strips that cover and
protect vent panel junctions were too long; these I cut shorter with tin snips.
The fourth leak mentioned above was difficult to repair,
as the weight of the greenhouse’s transparent panels was upon the two rotted
2x4 boards. Furthermore, additional 2x4s atop the Hardy-boards are rotten and still
need replacing, which will be a two-man operation that will be done during 2019.
The greenhouse owner is somewhat sensitive to pressure-treated wood, so the
original construction used untreated redwood or cedar 2x4s. While redwood,
cedar, and some other woods are naturally rot-resistant, they certainly are not
completely so, and we will be looking at alternatives come spring.
 We have also had to learn a lesson in varmint control. The
entire floor of the structure is underlain by eighth-inch wire mesh to prevent
rodents from burrowing into the greenhouse. This includes under the raised
beds, as mentioned above, and under the central floor’s four-inch-thick layer
of coarse sand. However, today I spotted on the bottom of the water tank a
drowned mouse that evidently fell in and could not climb out. We had been
wondering what was eating the leaves of the parsley and red Russian kale, and were advised by neighbors that it was probably slugs,
so we were planning to install beer traps. However, the mouse could also be the
culprit, as a cursory search has yet to turn up a single slug and there are
still many holes in the walls that need to be plugged. What do you think?
We have also had to learn a lesson in varmint control. The
entire floor of the structure is underlain by eighth-inch wire mesh to prevent
rodents from burrowing into the greenhouse. This includes under the raised
beds, as mentioned above, and under the central floor’s four-inch-thick layer
of coarse sand. However, today I spotted on the bottom of the water tank a
drowned mouse that evidently fell in and could not climb out. We had been
wondering what was eating the leaves of the parsley and red Russian kale, and were advised by neighbors that it was probably slugs,
so we were planning to install beer traps. However, the mouse could also be the
culprit, as a cursory search has yet to turn up a single slug and there are
still many holes in the walls that need to be plugged. What do you think?
Lastly, the photo below of the center of the greenhouse
should give you some idea of how much room there is inside. It is large enough
to add a central raised bed, but we will probably not do so since she wants the
space for meditation sessions. I hope to be able to show you more pics over
time as we finish topping up and planting the existing raised beds, adding the
additional soaker hose, adding hanging baskets, and allowing warmer weather
over the upcoming spring and summer to create a lush indoor green space. I might
even install some solenoid valves to completely automate the irrigation system.
